Verifying Uploaded Documents
When all the documents in an uploaded Encounter Folder have been processed, they must be verified for accuracy. They are then downloaded to your patient's MedKaz and to your PRM. Click here to see an overview of the documentation process.
When the documents are uploaded, they are processed and the contents of the PDF and TIFF files are "read" and transformed into a computer-readable text document that is stored in the Encounters table on the MedKaz. Before the files are sent to the MedKaz, this text file must be compared to the original and any errors in transcription be corrected. This is especially important for handwritten forms and notes that have been scanned.
- The Status page helps you keep track of uploads that are being processed, awaiting verification, and have been verified. When you first upload documents, they appear in the Uploads in Process table:

- Once the uploading and processing is complete, which should only take a minute or two, the document appears in the Uploads to be Verified table:

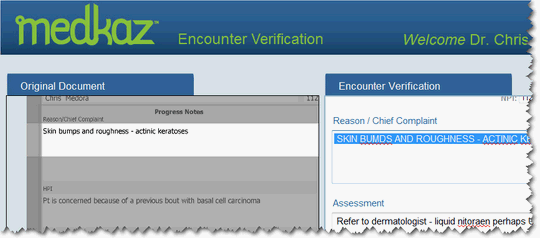
- To verify the accuracy of the text file that was created from the uploaded document, click the document-type link (Encounter Summary for example) to see a copy of the original file side-by-side with the processed data file. Compare the two, and, if necessary, correct mistakes in the Encounter Verification pane.

When comparing the two, click or highlight an area in the right-hand pane to control what appears in the left-hand pane. Double click in the left-hand pane to zoom in on a specific area.
Occasionally the Server misreads a word on the original document. You correct it in the Encounter Verification pane. For example, the word "bumps" was interpreted as "BUMDS".
- Select the errors in the Encounter Verification pane and key in the correct word:

- Tab from one data field to the next in the Encounter Verification pane. As you do, the corresponding field on the original document is highlighted so you can quickly identify and correct mistakes:

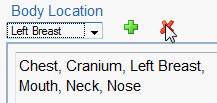
- When you verify the Body Location and Body Systems, use the drop-down list to select a missing or incorrect entry so that it displays in the field, then click the green plus icon
 to add it or click the red X icon
  to remove it.

- Once the entire document has been corrected and verified, scroll to the bottom of the Encounter Verification pane, enter your name or initials in the Verified By field, and click Continue to complete the processing for that document.

- Repeat the process so that each Encounter Document is corrected and verified
- When all documents for the particular encounter have been uploaded and verified, the Server automatically performs the following actions:
- Determines if the patient's MedKaz is connected to the computer; if so, the verified records are downloaded to the MedKaz; if not, an e-mail is sent to the MedKaz owner to let them know that records are available to be downloaded.
- Determines if the care provider has a PRM, and if so, e-mails the care provider that records are available to be downloaded.
